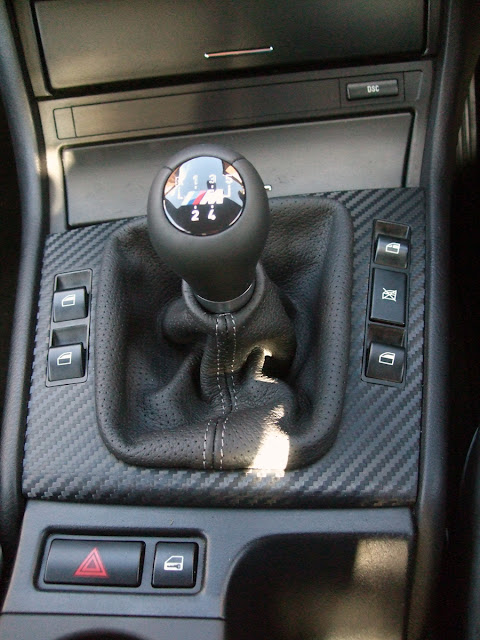
The original gear knob was looking extremely tired; leather worn, numbering sticker peeling and just plain boring. The gaiters weren't much better either, the leather now high gloss instead of matt, and cracking in all the usual places.
I started off looking at Alcantara gaiters to match the seats, but whilst searching eBay for inspiration found a perforated leather option too. I asked the seller, TopGaiters, for a bit more info and maybe a larger picture of both, just so I could decide if I liked either option. They were kind enough to send out two samples of both materials for free.
The sample settled it pretty quickly, the perforated leather had a much more premium feeling, and would lift the interior considerably. I decided on a light grey stitch, as I thought black would just blend in and any other colour would look out of place amongst the monochromatic surroundings.
At £29.99 for the gear gaiter and park brake gaiter they weren't cheap, but I was confident they would be worth it.
The gear gaiter was first to be swapped, as I was changing the gear surround trim at the same time for the carbon wrapped trim I had previously prepared. You can see my post about carbon wrapping the gear surround here -
Squeezing and lifting the gear gaiter reveals two screws securing the gear surround trim down. I removed those then removed the gear knob. A firm pull removes the gear knob, it's pretty tight on the gear stick so I had prepared myself for a bit of a struggle. (I'd read some rather comedic stories of people giving themselves black eyes whilst removing it.)
With the gear knob removed the gaiter simply slid off. The new gaiters don't come with the plastic substrate so a bit of salvaging had to be done on the old one. The old leather was very brittle and snapped in places, so it took a little bit of scraping to get all glue residue and leather fragments off the substrate before fitting it to the new one.
With the old gaiter removed from the substrate I put the two next to each other just to compare out of interest.
To help secure the plastic substrate to the new gear gaiter I used some Bostik Evo-stik Impact* contact adhesive around it's periphery.
After 10 years of use understandably there had been a lot of dust and crumbs fall underneath the gear surround trim, so before refitting I did a thorough vacuum of the area.
All cleaned I started reassembly, firstly by installing the new carbon wrapped gear surround trim, then the gaiter and finally the new gear knob. To read more about the carbon wrapped trim, take a look at this blog post - Carbon Wrapped - Gear Shift Surround.
My darling girlfriend bought me a shiny new M-Tec sport gear knob, a much smaller smooth leather wrapped gear knob with a chrome bezel. Much more premium and sporty, I believe it was a cost option at purchase and one I would definitely have picked.
All back together the gear shift area looks superb, far more premium, new, and much sportier.
Before
After
Now the gear shift area was all done, I could start on the park brake (handbrake) gaiter. Squeezing the base of the gaiter and a bit of pulling unclipped the gaiter from the console. Pulling it inside out revealed the cable tie holding it in place. Some cable cutters took care of the cable tie, releasing it from the handle. As with the gear gaiter, the plastic frame substrate had to be salvaged and glued in place.
Comparing the old and new gaiters.
Again I used Evo-stik to secure the gaiter to the plastic frame, then set about fitting it. This was slightly more tricky than the gear gaiter, as the new gaiters were such good quality materials, i.e. thicker, they didn't want to fit in the same size aperture in the console. With a bit of fiddling eventually it went in and the job was finished.
It actually fits a lot more snugly to the handle than it shows in the picture, nevertheless I am very happy with the results. The console looks much fresher, extremely worthwhile upgrade and refresh of the interior. The gear knob fits positively in the hand, and feels more direct when changing gears, they are expensive for what they are but I couldn't recommend one highly enough.
Here are the finished shots and a couple of before and afters.
Before and After's


2 Comments
and where do you get the plastic frames? Just bought an old run about and needing the handbrake frome for an e83 x3 - impossible unless you buy it from one place JF and their frames are crap and just split
ReplyDeleteHey ajsdisc, thanks for leaving a comment!
DeleteThe first place I'd try is eBay to see if anyone is breaking an old car with the right colour frame, you could probably get one cheap this way. If you can't find one that way, perhaps try a local scrap yard, or worst case try BMW themselves and get a brand new one.
Other than needing a new handbrake frame, hows the X3? I've never had the chance to drive one.
Hope you get your handbrake frame sorted! Be sure to let me know how you get on :)
Regards,
Andy.
Post a Comment
Let me know what you think by leaving a comment below.