
In this article, I'll explain everything you need to know about replacing your battery; from the signs of a dying battery, the E46 battery location, how to replace it and also my recommended replacement battery.
It's a pretty comprehensive guide, so if you just want to skip right to one section, use the handy quick links below.
The 9 Most Common Symptoms of a Failing Car Battery
BMW E46 OEM Battery Specs
BMW E46 Replacement Battery Specs
BMW E46 Battery Location
BMW E46 Battery Replacement Guide
This post contains affiliate links. Please read my disclosure for more info.
The 9 Most Common Symptoms of a Failing Car Battery
- Your lights are dimmer than usual
- Electrical faults might start to appear
- EML warning light is on
- Battery warning light is on
- It takes more engine cranks than usual to start
- The engine cranks but won't start
- The engine won't even crank
- You've had to jump start it recently
- Swelling battery case
As the British summertime is usually a couple of days in July, it typically won't take long before cold weather will cause the symptoms of a dying car battery to show themselves.

As was the case with my E46 330d, it's enthusiasm to start in the morning had dropped considerably, much like myself as a teenager...
It had got to a point where it was noticeably sluggish to start, at this point it was still starting but it took longer more cranks than it should. To be fair, the BMW OEM battery had lasted a pretty impressive 170k miles!
BMW E46 OEM Battery Specs
The battery specs of my OEM 330d battery, that I was removing, were as follows:
- BMW Part Number: 61218381764 / 61218381768
- Amp Hours (Ah): 90Ah
- Cold Cranking Amp (CCA): 720CCA

BMW E46 Replacement Battery Specs
The E46 battery size varies quite a bit depending on which model you have, so it's best to double check the fitment.

To make sure you get the right battery for your E46, go to Amazon*, put your car's details in the 'Shop by vehicle:' tool at the top and it'll tell you which batteries will fit your car.

For my E46 330d, the replacement battery I bought was an Exide Excell EB950, available on Amazon here*.
There were a couple of reasons why I chose the EB950, and why I think it's the best battery for the E46 330d.
- It offered the best performance at a very reasonable price
- It's from a premium battery manufacturer
- Exide batteries were used by BMW as OEM replacements under warranty.
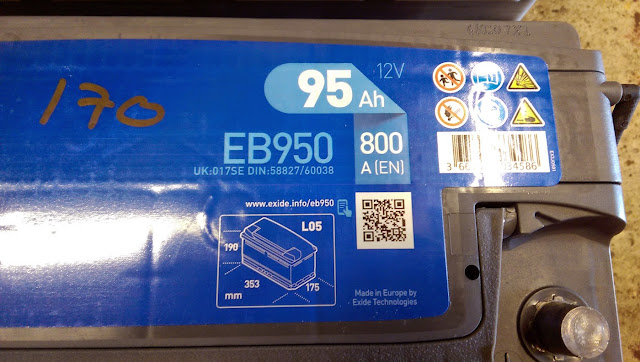
The EB950 battery specs are as follows:
- Amp Hours (Ah): 95Ah (+5Ah compared to OEM)
- Cold Cranking Amp (CCA): 800CCA (+80CCA compared to OEM)
- Battery Size: 353 x 175 x 190mm (+15mm compared to OEM)


BMW E46 Battery Location
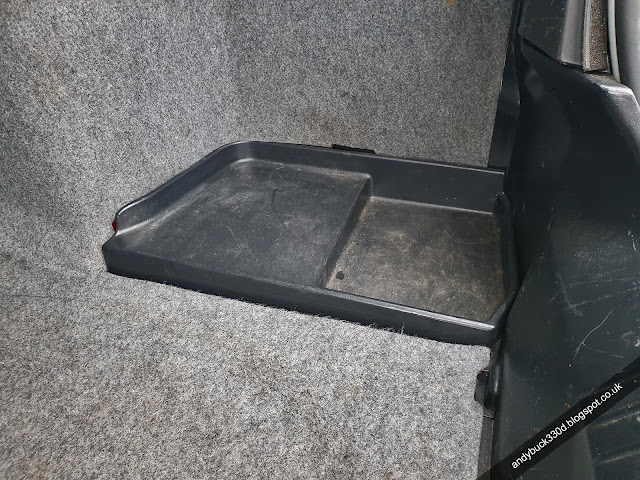
For the E46 sedan / saloon, touring and convertible, the battery is located in the trunk / boot, on the right hand side under the plastic tray.
The location of the E46 Compact battery is slightly different though, it's directly under the loadfloor.
BMW E46 Battery Replacement Guide
Tools Required
- Ratchet
- 10mm socket or spanner
- 13mm socket or spanner
- Cross head screw driver
- Flat head screw driver
BMW E46 Battery Removal
Just a quick note before we get started, the eagle eye'd readers will notice the Exide battery changes in some of the pictures. I used a combination of photos from mine and my Dad's E46, however, he went for the higher rated Exide EA 1000 battery. You can check out the specs and get yourself one on Amazon here*.
Step 1 - Remove the Battery Cover
Whoever designed the battery cover for this car needs a slap, it's the most awkward piece of trim to remove I've ever known. If there is a knack to it please let me know in the comments below.
Any-who to remove it, lift the boot carpet, which reveals the two plastic fixings securing it in place.
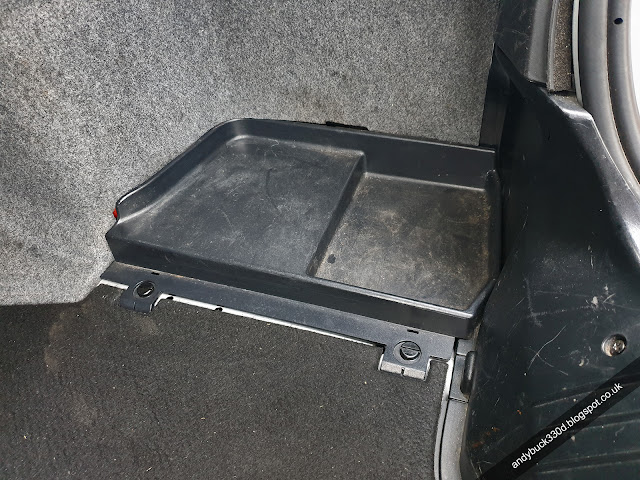
Use a flat head screw driver (or just your finger nail) to turn the two quarter turn plastic fixings, then lift and wiggle the plastic tray until it is free of the loadspace side carpet (like I said above, this is a pain in the a$$).


Step 2 - Remove the Negative Terminal
Make sure you remove the negative terminal first, before the positive terminal.
To remove it, undo the nut on the top of the negative battery terminal, this should be a 10mm nut (but it can vary).
Just before you remove the negative terminal, make sure you're pulling a suitably stupid face. Whenever I'm disconnecting a car battery I pull a face similar to that of Tommy and Turkish at the end of Snatch, I assume the battery is going to ark and explode every damn time...

Step 3 - Remove the Positive Terminal
Hopefully the wind didn't change whilst pulling your stupid face and you can get on with the rest of the job. Remove the positive terminal next. Lift the red terminal cover up, it hinges at the back, then undo the 10mm nut as per the negative terminal.

Step 4 - Remove the Battery Clamp Bracket
Using a cross head screw driver undo the centre screw, it doesn't have to be completely undone, just loosened.
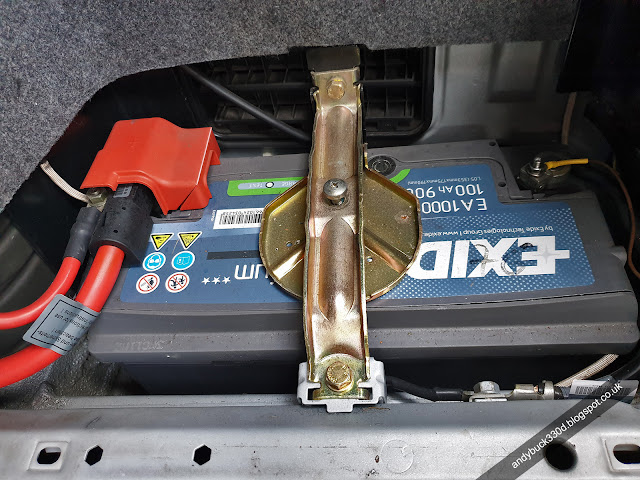
Then, using a 13mm socket, undo and remove the two bolts holding the battery clamp in place.
Step 5 - Remove the Battery Vent Tube
Finally, before you can remove the battery, pull the vent tube off the 90° vent tube elbow. You'll need to remove the elbow later and install it on the new battery.
Step 6 - Pull the Battery Out of the Car
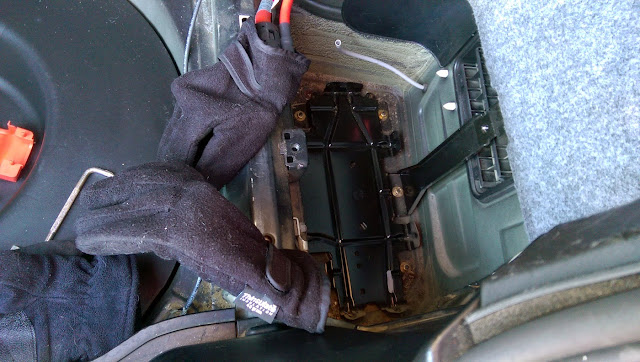
You're now good to heave the old battery out. Start your fitness tracker at this point, it's a workout lifting the thing out, it weighs a tonne.

I covered the negative and positive terminals with some gloves before pulling the battery out, just helps to avoid any accidental contact.
At this point, if your battery tray is anything like mine, it's the ideal opportunity to give it a clean out. Autoglym Engine & Machine Cleaner* is perfect for the job, spray it on the area, agitate with a detailing brush then wipe clean with a microfibre cloth.
BMW E46 Battery Installation
Step 7 - Swap the Battery Vent Tube to the New Battery
Make sure to swap the battery vent tube onto the new battery before you fit it into the car.

Step 8 - Lift the New Battery into Place
Lift and position your new battery onto the battery tray, make sure the battery vent tube and positive terminal end is nearest the front of the car.
Step 9 - Reconnect the Battery Vent Tube
Push the battery vent tube securely onto the 90° elbow.


Step 10 - Re-attach the Battery Clamp Bracket
Before you re-attach the battery clamp bracket, undo the screw to raise the plate height a little. My new battery was 15mm taller, so I had to undo it quite a bit to allow the bracket to go back into position.
Once you've done that, use a your ratchet and 13mm socket to tighten the bracket bolts.
Step 11 - Reconnect the Positive Terminal
Make sure you connect the positive terminal first, position the connector onto the terminal and use the 10mm socket to tighten the securing nut.
Step 12 - Reconnect the Negative Terminal
Position the connector onto the negative terminal and use the 10mm socket to tighten the securing nut. It will spark a little as you position the connector onto the terminal.
Step 13 - Tighten the Battery Top Clamp
Finally, tighten the screw in the top clamp so the battery doesn't jump around when going over bumps.


Step 14 - Job Done
All that's left to do is replace the battery cover and start her up!
Replacing the battery made a huge difference to my car, even at the height of winter with temperatures reaching minus figures (Celsius for my overseas readers) the car started promptly and with a renewed sense of purpose.
If this article has been useful please let me know in the comments below! Also feel free to share the article using the widget on the left.
3 Comments
Cheers mate, very handy guide!
ReplyDeleteThanks, glad it helped!
Deletethanks for this, my battery got taken by scrapman before I had chance to check the specs.
ReplyDeletePost a Comment
Let me know what you think by leaving a comment below.