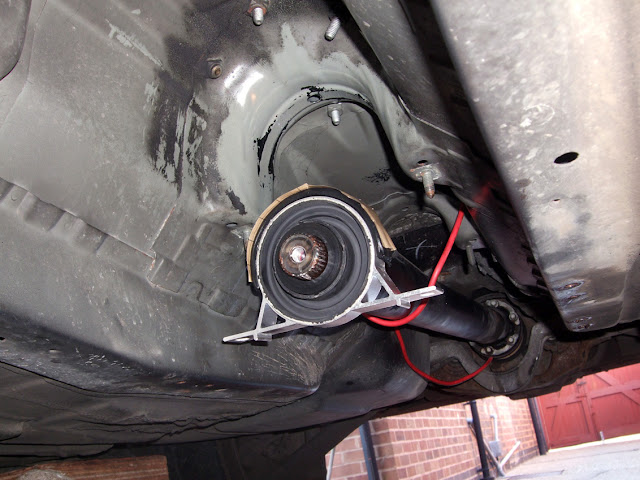
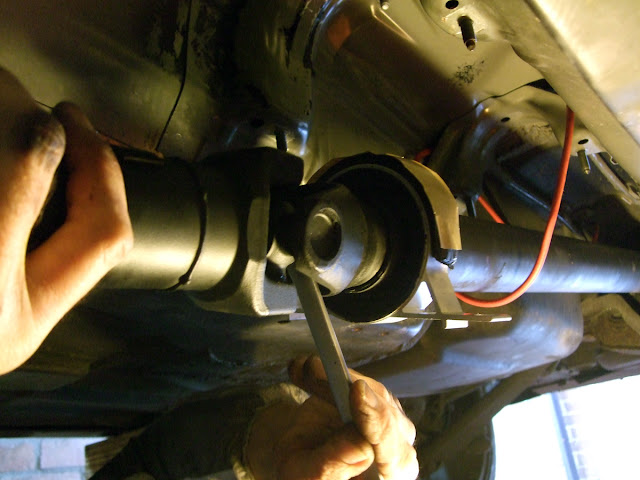
This article explains the symptoms of a worn propshaft centre bearing, the parts required to replace it and the process I used to replace the completely shot bearing on my 330d.

I'd advise reading through the whole of this article, if you're in a rush though, use the handy quick links below to skip to the relevant section.
Symptoms of a Worn Propshaft Centre Bearing
Diagnosing a Worn Propshaft Centre Bearing
Parts Required to Replace a Worn Propshaft Centre Bearing
Replacing a Worn Propshaft Centre Bearing
Symptoms of a Worn Propshaft Centre Bearing
Just a bit of admin before we get into it, prop shafts can be known by a few names; propeller shaft, drive shaft or Cardan shaft (or variations thereof).
An unsettling juddering and squeaking noise started occurring when accelerating and decelerating, usually in 2nd and 3rd gear but not exclusively, and usually between 1.5k and 2.5k revs, also not exclusively.
The judder felt like a rotational wobble, emanating from underneath the centre floor console armrest. The squeak also sounded like it was coming from the same area too.
The juddering was more on acceleration, and the squeaking more on deceleration. There was no loss of power, the clutch wasn't slipping and there was no change in the fuel economy. (See how you car compares with my 330d's real world fuel economy by following the link).
I did a bit of research and found it was most likely the guibo (flexible disc on the propshaft), but there was a small chance it could be the centre bearing on the propshaft also.
Diagnosing a Worn Propshaft Centre Bearing
Armed with my research I got the car on the ramps and started investigating. The guibo looked completely fine so, puzzled, I decided to delve deeper and remove all of the under side trim panels, and the exhaust from the Ecotune decat downpipe backwards. I had to replace the standard exhaust downpipe and cat as it was leaking and diesel exhaust fumes were getting into the cabin. Follow the previous link to read more.
It was fair to say I'd found the problem when I saw what's in the video below. The rubber boot in the propshaft centre bearing mount had completely disintegrated, providing no support at all to the propshaft. You can see my dad wobbling the propshaft in the video, whilst he's doing so you can see straight through the gap where the rubber boot should be.
Whilst you're on YouTube, check out my other E46 videos too!
Parts Required to Replace a Worn Propshaft Centre Bearing
Unfortunately I needed the replacement parts quickly as the car is my daily and had to be on the road. I didn't have much choice but to get the parts direct from BMW, at what would most likely be an extortionate price.
I called up and got a quote, £92.15, that included the following, all genuine, OEM BMW parts;
- 6x - p/n: 26117527475 - Hex Bolt - M12 x 1.5 x 71 - ZNS3
- 6x - p/n: 07129900047 - Self-locking hex nut - M12 x 1.5 - 10 - PHR
- 1x - p/n: 26122282496 - Aluminium Centre Mount, with Grooved ball bearing - D=55/D=35
- 1x - p/n: 26127511140 - Butyl cord Terostat 2460 - 190mm x 20mm x 8mm
- 6x - p/n: 33217571990 - Torx screw with ribs M10 x 46 - ZNS3
A lot of the bolts in this area are one use only and I wasn't sure how many I would have to remove to do the job, so just bought a replacement for all of them for peace of mind that the job was well done.


Replacing a Worn Propshaft Centre Bearing
All required parts acquired I got straight to work, first job being to crack the nut joining both halves of the propshaft. This turned out to be easier said than done, a rather large spanner extension and some choice French words later and it was removed.
Three bolts hold the front section of the propshaft to the flexi disc (guibo), after removing these the front section could be removed from the car. Before removing it though, I marked it at both ends with white paint to make sure it went back in the same orientation, quite important for balancing reasons I believe.


Now that the propshaft was separated, the shot centre bearing could be removed. The bearing came away fairly easily and so did the rest of the assembly. Quite a lot of the butyl cord was left stuck to the chassis, as I had bought a replacement strip I cleaned all the old stuff off. It's horrible stuff that sticks to anything and everything, so it took a little while to clean it up.
All cleaned, I prepared the new bearing for fitting, applying the new butyl cord strip to the mounting bracket. It was also a chance to compare new with old to show how bad the old one was.


Everything now prepared, reassembly could begin. The remaining half of the propshaft had been supported by a length of strong wire, whilst suspended and with the brown packaging film on the butyl cord still fitted, the centre bearing was pushed into place.

Next the removed portion of the propshaft was refitted.

Propshaft back together, all the other nuts and bolts were replaced with fresh ones, and finally the rest of the car was re-assembled.


Touch wood, since the work was carried out there has been no judder or squeaks, so hopefully it was caught just at the right time and all the work was done correctly.
Let me know in the comments below if you've had either the guibo or the centre bearing go on your car. Can your's top mine for how badly it had worn?
You can also follow me on Facebook, Instagram and YouTube, search andybuck123 for plenty more content to come!
13 Comments
Hi Andy I have the same problem on my car I've sourced a bearing and plan on doing it this weekend I was just woundering what kind of bolt was holding the 2 propshafts together so I know what tools I need to start the job thanks
ReplyDeleteHi Nick,
DeleteUnfortunately I can't really remember, however, you will need a spanner set with some sort of extension method for more leverage. I would hazard a guess at 17mm which seems to be a popular size on the 3 series. Be prepared for a long slog undoing it though, I found it much easier to undo with the propshaft connected at both ends, rather than lowering the front portion first.
Apologies I can't be of more use to you, best of luck with the job.
Andy.
Did this yesterday and the walk through was a huge help. The bolt holding the propshaft together us 18mm and a pig to get on - only thing seemed to be the ring end of a combination spanner. Offset and pen ended spanner won't fit and no chance with a socket and ratchet.
DeleteHello Andy, can you remember around how long it took to replace the bearing? and is the car still running problem free? Thanks
ReplyDeleteHi there,
DeleteIt was a long job I'm afraid, I think it took around 5 hours from memory. That was doing a thorough job at every stage though. The trouble was it requires a lot of other items off before you can get at it, under floor skid pans and covers. Then the faff of getting those back on. The ludicrously heavy exhaust being one of those things. Ideally you want two people on this job if you are doing it in your garage/on your drive.
If you have the correct tools, nothing gives you any trouble and are mechanically minded you could probably get this job done in 2-3 hours, but definitely allow for more. (There's always one bolt that doesn't want to know).
As for problems since, touch wood, the car seems fine. There are no symptoms that I experienced when the part had failed. Admittedly I haven't had the car in the air and taken a look.
Hope this helps,
Best regards,
Andy
This is probably ine of the clearest walk throughs ive read on any job. Thanks I have tue same job to tackle and I'll definitely be refering to your images and info. Cheers
ReplyDeleteHi there,
DeleteThanks for the comment and compliment, I hope the post goes some way to helping you out and making the job that much easier.
Best of luck,
Andy.
Hello,
ReplyDeleteI thought the driveshaft needs to be removed.... I found this in TIS. So I see no mention of bearing removal tools(also TIS), isn't the bearing pressed on to the rear section?
Looking forward for your reply.. I have a really bad knock at the tiniest amount of torque :( I got the parts but I want to make sure I have all the tools before I start.
Thanks.
Hey Ztig,
DeleteI'm afraid it was 7 years ago I did the job so my memory of it is a bit sparse.
I definitely didn't buy any of the tools in the TIS, mainly as I hadn't read it before doing the job. We (me and my Dad) worked it out as we went along.
We'd have definitely had a bearing puller on hand for removing the old bearing. As far as the 'special tool' for putting the new bearing on, we'd have likely had a bit of tube the right diameter for tapping the new one on. We didn't have a hydraulic press for sure.
I definitely only removed the front section of the propshaft, leaving the rear in place. Make sure to undo the 18mm screw in the middle before undoing the bolts in the front section of the propshaft to the guibo. Harveysduvet above suggests using the ring end of a combination spanner to undo the screw. I'd suggest having a tube you can slip over the spanner to get more leverage on it too (it's properly tight).
Apologies I can't be more helpful. If I find out any more info I'll update this comment.
Good luck pal!
Cheers,
Andy.
Thank you Andy for the help...mine is a 320d pre facelift and it has a 3 piece driveshaft. In the end I got it all together properly. All I can say is that this job is a pain in the ass to do alone. ��
ReplyDeleteRegards.
I liked your blog, thanks for sharing this
ReplyDeleteHi Tessa,
DeleteThanks for taking the time to leave a comment!
Glad you liked the blog :)
Cheers,
Andy
Hey Andy, thanks for your write up.
ReplyDeleteThat 18mm prop joining bolt is so tight I thought it might be a left hand thread!! But I guess not and I’ll keep trying to add extra torque.
Just one thing, I believe you have to add preload tension to the centre bearing/rubber assembly by sliding it forwards a few mm and then tightening. I haven’t seen the TIS for the 330d but that is common practice on the other E46 models
Post a Comment
Let me know what you think by leaving a comment below.