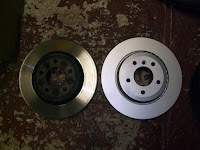
As mentioned in my previous post about replacing the parking brake shoes, the rear discs were measuring roughly 18mm, a full 2 and a bit mm smaller than the minimum thickness specified as 20.4mm.
How the discs were allowed to get to such a state by the previous owner I do not know.
Nevertheless I deemed it time to refresh the whole rear brake assembly.
I settled on a set of Pagid discs and Pagid pads, as these are highly recommended and often regarded as the best option. The correct size discs for the 330d is 320 x 22mm vented.
I picked these up at the same time as the brake shoes, for near enough £100.
*Please note, this is a guide on how I performed the replacement, not full BMW approved instructions. You should not attempt any work if you are not fully equipped and competent enough to do the job. I will also not be held responsible for any damage caused to your car from incorrectly following this guide.
Tools you will need
- Jack
- 10mm long socket
- 7mm Allen Hex bit socket
- 16mm socket
- 17mm socket
- Locking wheel nut bit
- Torx T40 bit socket
- Ratchet
- Flat Head Screwdriver
- Wire brush (optional for cleaning)
Step 1
Crack the nuts on the rear wheels using your 17mm socket. Then get the rear end jacked up safely on stands. Fully remove the wheels once jacked up, which should leave you with this.
Step 2
Taking a flat head screw driver, lever off the clip on the brake calliper. It can take a bit of doing, but just persevere, trying not to slip with the screw driver as you could cause unwanted damage to various components. I also decided to give my clips a wire brushing whilst they were off, just to clean them up a tad.
Step 3
Next take your Torx T40 bit and crack the fixing on the discs to the hub. It shouldn't take much effort, but you might need to hold the disc to stop it moving.
Step 4
Working behind the calliper now, prise the two fur tree plastic caps off of the calliper pin sockets. It shouldn't take much effort, you should be able to do it by hand, if not carefully use a flat head screw driver.
Step 5
With the caps removed, take the 7mm Allen bit socket and remove the two calliper pins. You might need to tease them out of the rubber surrounds with a screw driver on the thread from the side.
Once removed the calliper will pull away, if the discs are significantly worn it might take a little bit of force to pull the pads over the lip or build up on the outside of the discs. Rest the calliper safely on something, do not let it hang. You might want to clean it up while you have it off too, mine were pretty well caked in brake dust and grime. Make sure to avoid damaging the piston gaiter though!
Before (left) and After (right)
Calliper removed
With the calliper removed, still working behind the brake set-up, take the 16mm socket and undo the two set screws fixing the carrier to the hub. These will be tight so it will take quite a lot of force.
When the set screws are removed the carrier will just come away from the disc. Again, you may wish to clean the carrier up, mine was caked up with crud pretty bad.
Step 7
Fully undo the screw holding the disc to the hub, which was cracked earlier with the T40 Torx bit. The disc should then pull away. It might be ceased on so could require a bit of persuasion by way of a tap with a rubber hammer. As mine were so low I decided to weigh them, to see just what difference 4mm reduction in material makes. Turns out the old discs were 6.1kg and the new ones 7.2kg. So that's over a kilo per disc gone in material.
With the disc removed it should look like this.
At this point, if you want to replace your parking brake shoes, you should follow the how - to guide to replacing the parking brake shoes on a BMW E46 3 series 330d in this post, Parking Brake Shoes Replaced.
Step 8
Take your new disc and put it on the hub, replace the Torx head screw and tighten it hand tight for now. Also replace the carrier, making sure the 16mm set screws are very tight.
Step 9
Using a G-Clamp, compress the piston in the calliper. Keep an eye on the brake fluid level under the bonnet, don't let it overflow or rise too high. Once compressed, put your new brake pads in. Note, you will have to replace your pad sensor, or swap the old one to the new pads as long as the warning light hasn't come on in the dash.
Here's a comparison of the old and new pads.
Step 10
Refit the calliper and tighten the retaining pins using the 7mm Allen bit socket, replace the fur tree type caps and then finally replace the calliper clip. Also make sure to tighten up the Torx head screw in the disc, ensuring the disc is properly seated. You should now have a shiny new brake set-up, something like this.
All that now remains to do is replace the wheels and lower the car back down. Pump the foot brake to re-adjust the pads to the discs. You should expect the discs and pads to have to bed in before they are at peak performance.


0 Comments
Post a Comment
Let me know what you think by leaving a comment below.